Quick answer
To compress an image, re-encode it as JPEG or WebP at a quality around 75–85, and shrink its pixel dimensions if it’s larger than it will be displayed. This removes detail your eye rarely notices. PNG is lossless, so it only gets smaller through fewer pixels or simpler content.
A photo straight off a phone is often several megabytes, which is far more than a web page, an email, or an upload form needs. Compressing it well is mostly a matter of three decisions: which format, which quality, and how many pixels. This guide explains what each one actually does, so you can choose with confidence instead of guessing.
What does it mean to compress an image?
An uncompressed image is just a grid of pixels. In the browser, each pixel takes four bytes, one each for red, green, blue, and alpha (RGBA), so a 12-megapixel photo occupies about 48 MB once decoded. Image file formats exist to store that grid in far fewer bytes.
There are two ways to do it. Lossless compression finds patterns and stores them more efficiently, and decoding gives back every original pixel exactly. Lossy compression goes further: it throws away information your eye is unlikely to miss, then compresses what’s left. Lossy files are usually much smaller for photos, but each lossy save discards a little more.
How does JPEG compression work?
Knowing roughly what a JPEG encoder does makes its artifacts much easier to predict. It works in a few stages, and the quality setting controls the one that discards data.
- Color conversion. The image is converted from RGB into brightness (luma) and two color-difference channels (chroma). Your eyes are more sensitive to brightness detail than to color detail.
- Chroma subsampling. Encoders often store the color channels at lower resolution, commonly half width and half height (called 4:2:0). This is why sharp red text on a blue background can look smeared in a JPEG.
- 8×8 blocks. Each channel is split into 8×8 pixel blocks, and each block is transformed into frequencies: smooth gradients become a few low-frequency values, fine texture becomes high-frequency values.
- Quantization. The frequency values are divided and rounded. Lower quality means coarser rounding, so more high-frequency detail rounds to zero. This is the lossy step.
- Entropy coding. The remaining numbers, many of them zeros, are packed losslessly into the final file.
At high quality, the rounding is gentle and the changes are invisible at normal viewing size. At low quality, you start to see the block grid, ringing halos around sharp edges, and banding in skies. Lossy WebP uses a different block-based method with prediction, but the trade-off is the same: lower quality, fewer bytes, more visible artifacts.
Lossy vs lossless compression: which do you need?
The right type depends on the content, not on how important the image feels. Photos tolerate lossy compression well because their noise and texture hide small errors. Screenshots, diagrams, and logos have flat colors and hard edges, where lossy artifacts stand out.
| Lossy | Lossless | |
|---|---|---|
| Formats | JPEG, lossy WebP | PNG, lossless WebP |
| Pixels after decoding | Close to the original, not identical | Identical to the original |
| Quality setting | Yes, trades size against detail | No, every pixel is kept |
| Best for | Photos and complex, textured images | Screenshots, text, line art, logos, transparency |
| Repeated saves | Each save can lose a little more | No loss from re-saving |
In the browser, Image Edtr creates lossy output as JPEG or WebP and lossless output as PNG. Browsers don’t offer a quality control for PNG, so the quality slider disappears when PNG is selected.
What image compression quality setting should you use?
Quality is a number from 10 to 100 in the compressor. It isn’t a percentage of the original quality; it’s a dial for how coarsely the encoder rounds detail. The relationship between quality and file size is not linear: the top of the scale costs many bytes for differences that are hard to see, while the bottom of the scale saves fewer bytes per step and adds obvious artifacts.
For most photos, a setting around 75 to 85 is a sensible starting point. Go lower for thumbnails or images that will be shown small, where artifacts are hard to spot. Go higher for images with fine gradients, such as skies, skin, or product shots on a plain background, where banding shows up first.
The curve also depends on the image itself. A photo with lots of fine texture, like foliage, gravel, or fabric, needs more bytes at every quality level than a photo with large smooth areas. Film grain and sensor noise behave like fine detail, so a noisy low-light photo compresses less well than a clean daylight one. That’s why it’s worth testing your own image rather than relying on a fixed number.
Notice where the curve flattens. Past that point, raising the quality buys very little visible improvement for a lot of extra bytes. Also notice that PNG stays flat across the whole range, because it has no quality setting to change.
How do I compress an image without losing quality?
Strictly speaking, only lossless compression keeps every pixel. In practice, what people want is to compress an image without losing visible quality, and that is very achievable. These steps matter most, roughly in order of impact.
- Use fewer pixels. A 4000-pixel-wide photo shown 800 pixels wide carries many times more data than the screen can display. Shrinking the dimensions first usually saves more space than any quality setting. See how to resize images.
- Match the format to the content. Use JPEG or WebP for photos, and PNG or lossless WebP for screenshots and graphics. A photo saved as PNG is usually much larger than the same photo as JPEG.
- Start from the original. Compress from the highest-quality file you have. Recompressing an already compressed JPEG stacks artifacts on top of artifacts.
- Compress once, at the end. Do your cropping, resizing, and edits first, then encode a single time.
- Compare at real size. Judge the result at the size it will be displayed, not zoomed in to 400%.
Which format compresses best: JPEG, PNG, or WebP?
For photos, WebP usually produces a smaller file than JPEG at similar visual quality, and both are far smaller than PNG. JPEG remains the safest choice when you don’t know what app will open the file, since some older software and email clients don’t display WebP. For graphics with flat colors, text, or transparency, PNG or WebP keep edges crisp.
If you need to change format without thinking about size, the convert tool does just that. For a deeper comparison, including GIF, AVIF, and SVG, read JPG vs PNG vs WebP.
How to compress an image with Image Edtr
The compressor runs entirely in your browser. Your file is decoded and re-encoded on your device and is never uploaded, so it works for private photos and documents too.
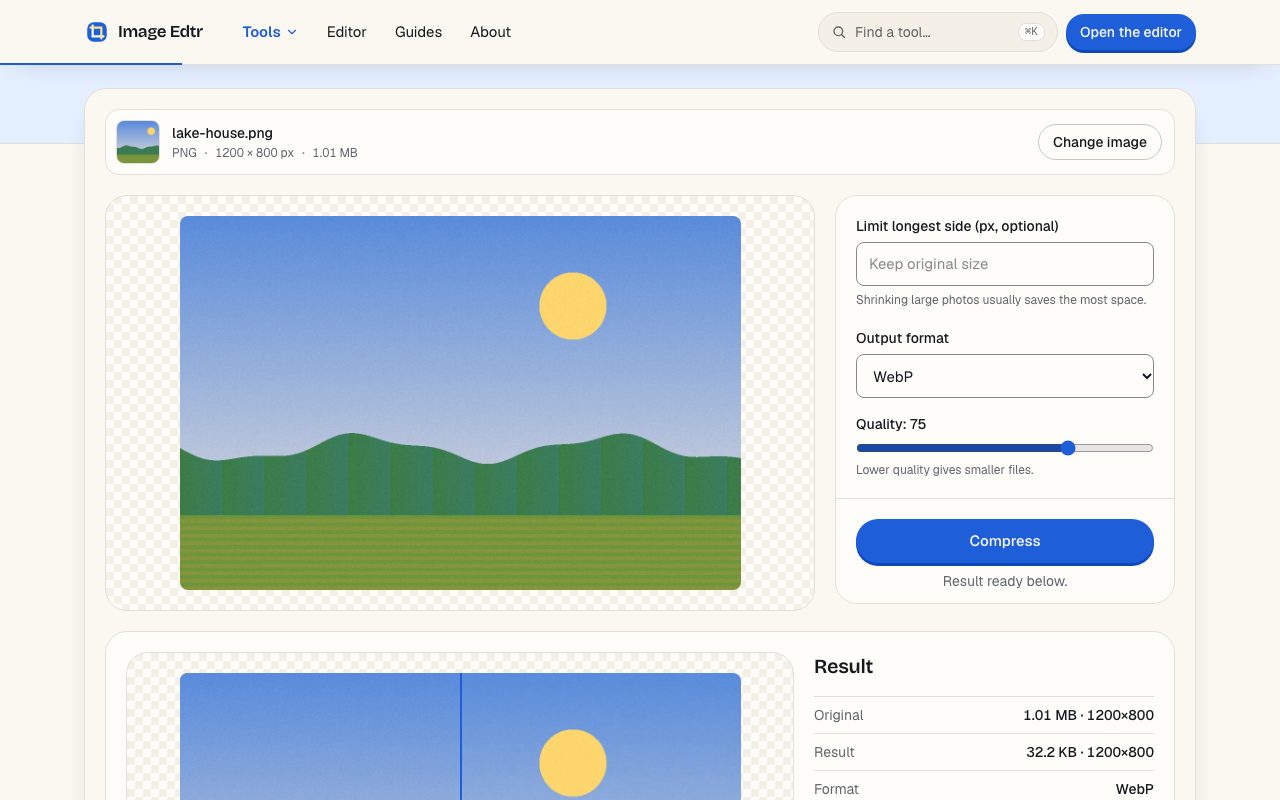
Choose an image
Select a file or drop it onto the page. JPEG, PNG, WebP, GIF (first frame), BMP, and AVIF where your browser can decode it are accepted, up to 50 MB.
Optionally limit the longest side
Enter a maximum width or height in pixels if the photo is larger than you need. Leave it empty to keep the original dimensions.
Pick a format and quality
WebP at quality 75 is selected to start. Switch to JPEG for maximum compatibility, or PNG for lossless output, and adjust the quality slider.
Compress and compare
Select Compress. The result panel shows the original and new sizes and how much smaller or larger the file became.
Download
If the result looks right and is smaller, download it. If not, adjust the settings and compress again.
Have a folder of photos? The batch tool applies the same compression to up to 50 files, processing two at a time, and lets you download them individually or as a ZIP.
Why did my compressed image get larger?
Compression doesn’t always shrink a file. If the original was already saved at a low quality, re-encoding it at a higher quality spends bytes faithfully preserving the existing artifacts. Converting a photo to PNG almost always makes it bigger, because lossless compression can’t discard the photo’s noise. And a small, simple graphic may already be near its minimum size.
How to reduce image size in KB for web, email, and uploads
Many forms and platforms set a file size limit in kilobytes or megabytes. There’s no single setting that hits an exact number, because the result depends on how much detail the image has. A busy photo of leaves compresses less than a portrait against a plain wall at the same settings. A reliable approach is to work from the outside in.
- Set the longest side to what the destination actually displays. For a web page, that’s about the displayed width, doubled for high-density screens.
- Choose WebP for web pages you control, or JPEG for email attachments and upload forms that may not accept WebP.
- Start at quality 80 and compress. If the file is still too large, lower the quality in steps of 5 to 10 and check for artifacts each time.
- If you still can’t reach the target without visible damage, reduce the dimensions further instead of pushing the quality very low.
To compress an image for the web specifically, also serve it at the size it’s displayed. The browser can choose between several sizes if you provide them, which the MDN guide to responsive images explains.
What else changes when you compress a photo?
Re-encoding creates a brand-new file from the pixels, so anything outside the pixels doesn’t come along. That’s usually a benefit, but it’s worth knowing.
- Metadata is dropped. EXIF data such as camera model, capture date, and GPS location is not copied to the output. Safari adds a minimal EXIF block to JPEG output with only the color space and pixel size.
- Color profiles are not kept. Output is sRGB. Photos captured in a wider color space, such as Display P3, may look slightly less saturated on displays that can show wider color.
- Transparency needs a supported format. JPEG has no transparency, so transparent areas are filled with a background color you choose, white by default. Pick PNG or WebP to keep them.
- Animation is not kept. Animated GIF and WebP files are read as their first frame.
Frequently asked questions
What is the best quality setting to compress a JPEG?
For most photos, quality 75 to 85 gives a good balance of size and appearance. At low settings, block artifacts and banding become noticeable in detailed areas and smooth gradients. Near the top of the scale, the file grows quickly for differences that are hard to see. Check the result at the size it will be displayed.
How do I compress a PNG without changing it to JPEG?
Keep PNG as the output and reduce the pixel dimensions, since browsers don’t provide a PNG quality setting. If the image has transparency and you can accept a different format, lossless or lossy WebP often makes a smaller file while keeping the transparent areas intact.
Does compressing an image reduce its resolution?
No, compression alone keeps the same pixel dimensions. It only changes how the pixels are stored. Resolution changes only if you also resize, for example by using the optional longest-side limit in the compressor. Fewer pixels plus a sensible quality setting is usually the most effective way to reduce image file size.
Why does my image look blocky after compressing?
Blockiness comes from JPEG’s 8×8 pixel blocks when quality is set too low, or from compressing a file that was already compressed. Raise the quality, start from the original file, or try WebP, which tends to degrade more smoothly at low settings. Hard edges and text are especially prone to artifacts, so consider PNG for screenshots.
Can I compress an image to an exact size, like 100 KB?
Not with a single setting, because the same quality produces different sizes for different images. Reduce the dimensions first, then lower the quality step by step until the file fits. The result panel shows the exact size and the change after each try, so you can stop as soon as the file is under the limit.
Is it safe to compress private photos online?
With Image Edtr, the photo never leaves your device. Decoding and encoding happen in your browser, and no network request contains your image. Re-encoding also drops EXIF metadata such as GPS location, which is useful before sharing. You can read more on the privacy page.
Should I compress images before uploading them to a website builder?
Usually yes. Some platforms recompress uploads, but starting with a reasonably sized, well-compressed file keeps uploads fast and avoids storing huge originals. Resize to roughly twice the displayed width and use quality around 80, then check that the platform doesn’t require a specific format such as JPEG.