Quick answer
To crop an image well, pick the aspect ratio first (1:1, 4:5, 9:16, or 16:9 for most social posts), then place the frame using the rule of thirds. Cropping removes pixels rather than shrinking them, so crop before resizing. Image Edtr crops in your browser with presets, dragging, or exact pixel fields.
Cropping looks like the simplest edit there is: draw a box, keep what’s inside. In practice, two decisions decide whether the result works. The first is the shape of the box, which has to match where the image will be shown. The second is where the box sits, which decides what the viewer looks at first. This guide covers both, plus the pixel math that tells you how much resolution you keep.
What does it mean to crop an image?
When you crop an image, you keep a rectangle of the original pixels and discard everything outside it. Nothing is scaled. A 4000 × 3000 photo cropped to its center 3000 × 3000 keeps those exact 3,000 × 3,000 pixels at full detail, and the 500-pixel strips on each side are gone from the new file.
That makes cropping different from resizing. Resizing keeps the whole picture and changes how many pixels describe it. Cropping keeps part of the picture at its existing density. You often need both: crop to get the right shape and subject, then resize to get the right pixel dimensions. The resize guide covers the second half.
Aspect ratio vs resolution: two different numbers
Aspect ratio is the shape of an image: width divided by height, written as a pair like 16:9. Resolution is how many pixels the image has, like 1920 × 1080. A 1920 × 1080 image and a 640 × 360 image share the same 16:9 aspect ratio but have very different resolutions.
This distinction matters because platforms and layouts usually care about shape first. If you upload a 3:2 photo into a slot designed for 1:1, the platform has to do something with the extra width: crop it automatically, add bars, or shrink it to fit. Cropping yourself means you choose what stays. Resolution matters second, because the platform can scale a correctly shaped image up or down far more gracefully than it can guess your composition.
The math is simple. For a target ratio of W:H, height equals width × H ÷ W. A 1080-pixel-wide image at 4:5 is 1080 × 5 ÷ 4 = 1350 pixels tall. At 16:9 it would be 1080 × 9 ÷ 16 = 607.5, which rounds to 608. When the result isn’t a whole number, a pixel of rounding is normal and invisible.
Common aspect ratios for social media and the web
Here are the shapes you’ll run into most. Treat the “typical use” column as a starting point: platforms change their recommendations and how they display posts, so check the current guidance of the platform you’re posting to before a big campaign.
| Ratio | Shape | Typical use | Image Edtr preset |
|---|---|---|---|
| 1:1 | Square | Feed posts, profile photos, product thumbnails | Yes |
| 4:5 | Tall portrait | Portrait feed posts that take up more screen height | Use Free with exact fields |
| 9:16 | Full-screen vertical | Stories, reels, short vertical video covers | Yes |
| 16:9 | Widescreen | Video thumbnails, slides, website hero images | Yes |
| 1.91:1 | Wide banner | Link preview images when a page is shared | Use Free with exact fields |
| 4:3 | Classic landscape | Many phone and compact camera photos, presentations | Yes |
| 3:2 | Classic landscape | Many interchangeable-lens camera photos, prints | Yes |
Many platforms also display profile photos inside a circle. A circle fits inside a square, so crop profile photos to 1:1 and keep the face well away from the corners, which will be hidden.
How to crop a photo for Instagram and other feeds
Most feed-based apps accept a few shapes, and the choice is a trade-off between how much screen a post occupies and how much of the scene it shows. Square is the safe default and works almost everywhere. A 4:5 portrait crop takes up more vertical space on a phone, which suits people and products. A 9:16 crop fills the screen in stories and reels, but anything near the top and bottom edges may sit under the app’s own buttons and captions.
- Square (1:1): choose the 1:1 preset. The crop box appears centered at the largest square that fits; drag it over your subject.
- Portrait (4:5): choose Free, then type the size. From a 4000 × 3000 landscape photo, the largest 4:5 crop is 2400 × 3000. From a 3000 × 4000 portrait photo, it’s 3000 × 3750.
- Vertical (9:16): choose the 9:16 preset. Keep text and faces in the middle band so the app’s interface doesn’t cover them.
- Link preview (1.91:1): choose Free and set height to width ÷ 1.91. A 1200-pixel-wide crop would be about 628 pixels tall.
How to crop an image to square without cutting off the subject
Turning a rectangle into a square always removes something. From a 4:3 landscape photo, a full-height square keeps 75% of the width, so a quarter of the scene goes. Decide which quarter before you crop.
- Find the subject’s edges. Leave a little space around heads, hands, and products. Cropping exactly at a joint (wrists, knees, chin) tends to look accidental.
- Give the subject room to look into. If a person faces right, put more space on the right of the frame than behind them.
- Don’t always center. Centered works for symmetrical subjects and product shots. For people and scenes, an off-center placement often feels more natural.
- Crop a little smaller if needed. The square doesn’t have to use the full height. A smaller square can tighten the composition, as long as enough pixels remain for where it’s going.
Using the rule of thirds when you crop
The rule of thirds divides the frame into a 3 × 3 grid with two horizontal and two vertical lines. Placing the subject on one of those lines, or where two of them cross, usually produces a more balanced picture than putting it dead center. Horizons look calmer on the upper or lower third line than across the middle. Eyes in a portrait often sit well on the upper third.
It’s a guideline, not a law. Symmetrical scenes, reflections, and straight-on product photos often look best centered. The useful habit is to make the choice on purpose: when you drag the crop box, ask whether the subject sits on a third line or the center, and whether that serves the picture.
How to crop image files online with Image Edtr
Image Edtr’s crop tool runs in your browser, so you can crop an image online without sending it to a server. It accepts JPEG, PNG, WebP, GIF (first frame), BMP, and AVIF where your browser can decode it.
Choose an image
Drop a file onto the tool or pick one from your device. The whole image starts selected. Files up to 50 MB and 40 megapixels are supported, with no side longer than 16,384 px.
Pick an aspect preset
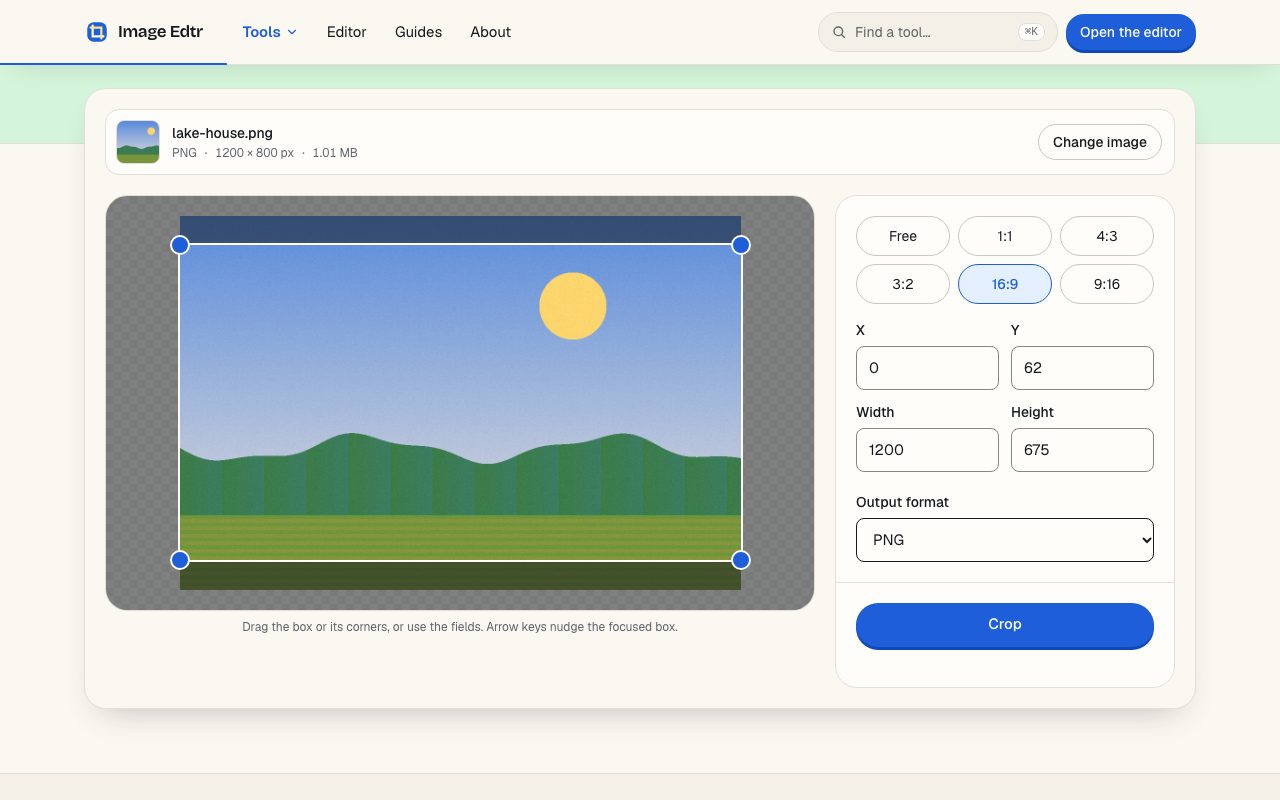
Choose Free, 1:1, 4:3, 3:2, 16:9, or 9:16. A preset places the largest centered crop of that shape and keeps the ratio locked while you adjust it.
Position the crop box
Drag the box to move it or drag its corners to resize it. With the box focused, the arrow keys nudge it 1 px at a time, or 10 px with Shift held.
Fine-tune with exact numbers
Type X, Y, Width, and Height in pixels. With a preset active, changing width updates height to keep the ratio, and the other way around.
Crop, check, and download
Choose an output format (JPEG, PNG, or WebP where your browser supports it), select Crop, compare the preview, then download the file.
How do I crop an image to exact pixels?
Use the numeric fields. X and Y are the distance in pixels from the image’s left and top edges to the crop’s top-left corner. To crop a 1080 × 1350 area starting 200 px from the left and 0 px from the top, choose Free, then enter X 200, Y 0, Width 1080, Height 1350. Values that would run past the image edge are clamped to fit.
If you need a size larger than the crop area you can get, such as a 1080-wide crop from a 900-pixel-wide photo, crop to the right shape first and then use the resize tool. Keep in mind that enlarging can’t add detail that wasn’t captured.
Does cropping reduce image quality?
Cropping itself doesn’t blur or soften anything: the kept pixels are identical to the original. What changes is the total pixel count, and that affects how large the image can be displayed or printed before it looks soft.
| Crop | Largest size | Megapixels kept |
|---|---|---|
| Original 4:3 | 4000 × 3000 | 12.0 MP |
| 1:1 square | 3000 × 3000 | 9.0 MP |
| 16:9 widescreen | 4000 × 2250 | 9.0 MP |
| 4:5 portrait | 2400 × 3000 | 7.2 MP |
| 9:16 vertical | 1688 × 3000 | about 5.1 MP |
| Tight 1:1 on a face | 1000 × 1000 | 1.0 MP |
Even the tight crop in the last row is plenty for a profile photo. Heavy crops matter more for large prints and full-width website images, where a small source will be stretched across a big area.
There is one other quality factor: saving. Any tool that writes a new file re-encodes it. Choosing JPEG or WebP at a lower quality setting adds compression artifacts, while PNG is lossless but usually larger for photos. If you plan to edit further, export at high quality or as PNG and compress once at the end. The compression guide explains the trade-off.
Crop first, then resize: getting the order right
For most jobs, the right order is rotate if needed, crop to shape, resize to the final pixel dimensions, and compress last. Cropping first means you resize only the pixels you’re keeping, and you make composition decisions on the full-resolution original rather than a shrunken copy.
- Straighten the orientation. If the photo is sideways or mirrored, fix it with the rotate and flip tool first. The rotate and flip guide explains why photos sometimes appear sideways.
- Crop to the target aspect ratio. Use a preset or exact numbers.
- Resize to the pixel size you need. Fit within the width your layout actually displays.
- Compress for delivery. Pick a format and quality that keep the file small enough for the page or platform.
If you’d rather do the crop, rotation, and color adjustments in one place, the photo editor includes crop with aspect presets, rotate and flip, brightness, contrast, and export with an optional resize. Rotating in the editor clears the current crop because the frame changes shape, so rotate before you crop there too.
Cropping images for websites and responsive layouts
On the web, the same image often appears at different shapes: a wide hero on desktop and a taller crop on phones. CSS can enforce a shape with the `aspect-ratio` property and fill it with object-fit: cover, which trims the overflow automatically. That trimming is centered by default, so a subject near the edge can be cut off.
When composition matters, crop the versions yourself and serve them with the <picture> element or srcset, as MDN’s guide to responsive images describes. Hand-cropped variants let each screen size show the subject properly instead of relying on an automatic center crop. Setting width and height attributes on the <img> also lets the browser reserve the right space before the image loads, which prevents layout jumps.
Frequently asked questions
What’s the best aspect ratio for social media posts?
Square 1:1 is the most widely accepted shape and a safe default. Portrait 4:5 fills more of a phone screen in many feeds, 9:16 suits stories and reels, and 16:9 suits video thumbnails. Platforms update their recommendations and display rules, so check the current guidance of the platform you’re posting to before preparing a large set of images.
Why isn’t there a 4:5 preset?
The crop tool’s presets are Free, 1:1, 4:3, 3:2, 16:9, and 9:16. For 4:5, choose Free and type the size directly: height is width × 1.25, so 1080 wide becomes 1350 tall, and 2400 wide becomes 3000 tall. You can then drag the box into position before cropping.
Does cropping make my photo blurry?
No. Cropping keeps the original pixels exactly and only removes the ones outside the box. The image has fewer pixels afterward, so it may look soft if you display it much larger than its new size. Saving as JPEG or WebP at a low quality setting can also add artifacts, which is separate from the crop itself.
Should I crop or resize first?
Crop first, then resize. Cropping on the full-resolution original gives you the most room to compose, and resizing afterward means only the kept area is scaled to your target size. If the photo also needs rotating, do that before cropping so the frame is upright while you position the crop box.
How do I crop a circle for a profile photo?
Crop to a 1:1 square and let the platform apply the circle. Most platforms that show round avatars mask a square image, so the corners are hidden. Keep the face centered with some space around it. The crop tool outputs rectangular images only; it doesn’t create a transparent circular file.
Can I crop several images at once?
Not with the crop tool. Each photo needs its own composition, so cropping is done one image at a time. The batch tool can resize, compress, or convert many images together, which is useful after cropping. See the batch processing guide for that workflow.
What do the X and Y fields mean?
X and Y set the top-left corner of the crop box, measured in pixels from the image’s left and top edges. X 0, Y 0 is the top-left corner of the photo. Width and Height then set the box size. If the values would extend past the image edge, the tool clamps them so the crop stays inside the photo.